こんにちは、もしくはこんばんは。シロです!
model-viewerは、Web上で簡単に3Dモデルを表示できるJavaScriptライブラリです。
しかし、残念ながら具体的な使いかたのドキュメントが少なく、調べるのに苦労したので自分でまとめることにしました!
この記事では、Webページ上で3Dモデルのマテリアルとシーンを切り替えるMaterials & SceneのAPIについて、検証した結果も含めて解説していきます。
Attributes:属性
variant-name
variant-name属性は、3Dモデルのバリエーションを切り替えるために使用します。
3Dモデルには、異なるテクスチャ、色、素材などの異なるバリエーションが存在する場合があります。
variant-name属性を使用すると、同じ3Dモデル内に複数のバリエーションを定義し、ユーザーが切り替えることができます。
例えば、異なるカラーの車の3Dモデルを持っている場合、variant-name属性を使用して赤い車、青い車、緑の車などの異なる色のバリエーションを定義することができます。
orientation
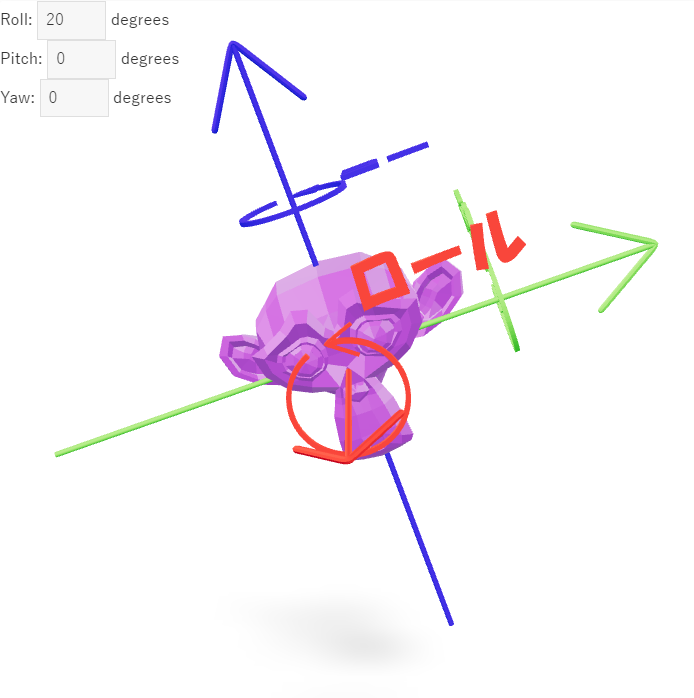
orientation属性は、3Dモデルの回転を制御するために使用します。
この属性は、ロール(Z)、ピッチ(X)、ヨー(Y)軸を基準にした回転を使用して、3Dモデルを回転させることができます。
単位はdegree(度)です。デフォルトはorientation = "0 0 0"です。
この例では、入力エリアに設定した値に応じて、3Dモデルの回転を行っています。
<model-viewer id="transform" orientation="20deg 0 0" shadow-intensity="1" camera-controls src="path/to/model.gltf" alt="A 3D model of an astronaut">
  <div class="controls">
    <div>Roll: <input id="roll" value="20" size="3" class="number"> degrees</div>
    <div>Pitch: <input id="pitch" value="0" size="3" class="number"> degrees</div>
    <div>Yaw: <input id="yaw" value="0" size="3" class="number"> degrees</div>
  </div>
</model-viewer>
<script>
const modelViewerTransform = document.querySelector("model-viewer#transform");
const roll = document.querySelector('#roll');
const pitch = document.querySelector('#pitch');
const yaw = document.querySelector('#yaw');

const updateOrientation = () => {
  modelViewerTransform.orientation = `${roll.value}deg ${pitch.value}deg ${yaw.value}deg`;
};

roll.addEventListener('input', () => {
  updateOrientation();
});
pitch.addEventListener('input', () => {
  updateOrientation();
});
yaw.addEventListener('input', () => {
  updateOrientation();
});
</script>scale
scale属性は、3Dモデルの大きさを指定するために使用します。
この属性にスケール倍率を指定することで、オブジェクトのスケールを変更できます。たとえば、scale="2 2 2"と指定すると、オブジェクトがXYZのすべての方向で2倍にスケールアップされます。
デフォルト値はscale = "1 1 1"です。
3Dモデルのロード前にスケールを指定した場合は、3Dモデルがフレーム内に収まるようにカメラの自動フレーミングが行われますが、手動で変更した場合はupdateFraming()メソッドを呼び出す必要があります。
この例では、入力エリアに入力した値に応じてモデルの大きさを変更しています。
<model-viewer id="scale" shadow-intensity="1" camera-controls touch-action="pan-y" src="path/to/model.gltf" alt="A 3D model of an astronaut">
  <div class="controls">
    <div>
      Scale: X: <input id="x" value="1" size="3" class="number">,
      Y: <input id="y" value="1" size="3" class="number">,
      Z: <input id="z" value="1" size="3" class="number">
    </div>
  </div>
</model-viewer>
<script>
const modelViewerScale = document.querySelector("model-viewer#scale");
const x = document.querySelector('#x');
const y = document.querySelector('#y');
const z = document.querySelector('#z');

const updateScale = () => {
  modelViewerScale.scale = `${x.value} ${y.value} ${z.value}`;
  modelViewerScale.updateFraming();  // カメラをフレーム内に収める
};

x.addEventListener('input', () => {
  updateScale();
});
y.addEventListener('input', () => {
  updateScale();
});
z.addEventListener('input', () => {
  updateScale();
});
</script>Properties:プロパティ
availableVariants
availableVariantsプロパティは、使用可能なバリアント名のリストを取得するために使用します。
availableVariantsプロパティを使用することで、アプリケーションで使用可能なバリアントを動的に制御することができます。
たとえば、このプロパティを使用して、使用可能な色、テクスチャ、または形状を切り替えることができます。
model
modelプロパティは、<model-viewer>で使用可能なマテリアルAPIのメソッドを含むオブジェクトです。
マテリアルAPIについては、以下の関連記事を参照ください。

originalGltfJson(準備中)
Methods:メソッド(準備中)
exportScene(options)
materialFromPoint(clientX, clientY)
createTexture(uri, type?)
createVideoTexture(uri)
createCanvasTexture()
createLottieTexture(uri, quality?)
まとめ
この記事では、<model-viewer>のMaterials & Scene APIについて解説しました。
3Dモデルのマテリアルやテクスチャを動的に変更できるようになると、3Dコンテンツの表現力が無限に広がりますね!
ぜひユーザビリティにあふれた、魅力的な3Dコンテンツを作成していきましょう!
以上、「【model-viewer】Materials & Scene API」でした。

